
Design Instructions
DESIGN INSTRUCTIONS
These designs are simple and easy to do, especially with large groups or as a first-time dyer!
Make sure you’re prepared with
Fabric: Follow steps 1-3 of our Tie-Dye instructions to prepare your fabric for dyeing. These folds can be done with both Liquid Tie-Dye and Ice Dye.
Tying Surface: Any clean, flat, smooth surface
Dyeing Surface: Different surfaces will yield different results. You can use clean scrap cardboard or ‘Puppy Training Pads’ to absorb most of the dye runoff that will come out of the fabric. If you want dye to drain away from the fabric as it sits, use a wire rack over a bin or sink. Do not use raw steel or aluminum racks, as raw steel will rust, and aluminum will react with the dyes and may ruin the fabric. Plastic coated wire, plastic, stainless steel, or plated racks should all be OK to use. Plastic sheets, tarps or glass are not good dyeing surfaces, as dye will pool under the fabric and ruin your design.
Tools: Use any one of several tools to put dye on fabric; pipettes, squeeze bottles, syringes, foam paint brushes, eyedroppers, spoons, etc. When we dye, we typically prefer small tools like pipettes.
Ties: Rubber bands, sinew, twine, fishing line, zip ties etc. The thicker your ties, the more the fabric will ‘resist’ dye penetrating the places where the fabric is bound. Use thin rubber bands if you don’t want any resist, or big knots of sinew to create clean lines on your fabric.
Spiral
|
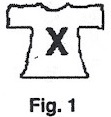
Pinch fabric in the center (see the X) with your thumb and index finger. Ensure your pinch has all layers of the fabric you will be dying within it. This pinched fabric will be the center of your spiral.
|
 |
|
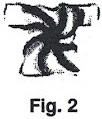
Begin twisting the fabric in a clockwise direction leaving the fabric as flat as possible. |
 |
|
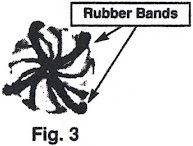
Place 2-3 thin rubber bands under and around the fabric across the middle to hold the fabric together and the tie in place. The rubber bands are there simply to hold the fabric in place so it will not unravel. Rubber bands should not bind or squeeze the fabric. You can use these rubber bands as guidelines when applying dye. |
 |
|
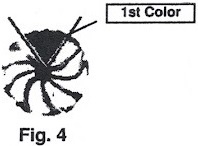
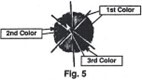
To apply dye, start with one color and apply dye in a wedge shape like a piece of pie. Saturate this wedge of fabric with dye. |
 |
|
Next, using the same color, saturate another wedge of fabric straight across from the first colored piece. Repeat this step with any additional color you’re using, making new ‘pie pieces’ for each color. Where colors meet each other, they should just touch or slightly overlap. Flip tied fabric over and apply colors in exactly the same way. You should not see any white space on tied fabric – DO NOT untie fabric. |
 |
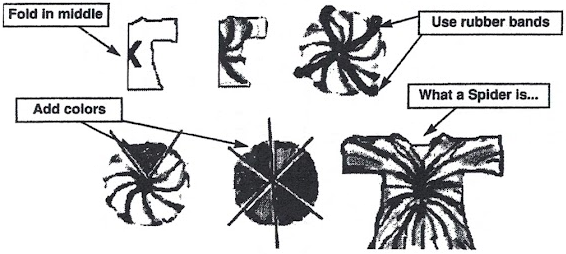
Spider
First, fold fabric in half. Make sure to keep the sleeves together!
Then, follow the same instructions used to create a Spiral, twisting the spiral from the middle edge of the fold.
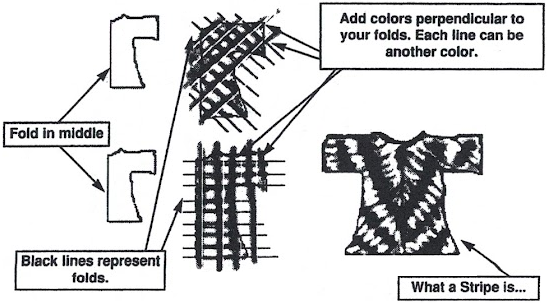
STRIPES
Whether vertical, horizontal or diagonal, stripes are made the same way.
First, lay fabric flat. Fold fabric in ½ if desired. Choose your starting point and pinch up a thin layer of material running the length of the fabric. Fold the material using a back-and-forth accordion fold. Make the folds perpendicular to the direction you want the stripes to run. Use rubber bands to hold the fabric in place, making sure not to bind or squeeze the fabric. Apply dye in stripes perpendicular to the folds. Turn the fabric over and apply dye.
MARBLING
Remove fabric from fixer water. For best results, leave fairly damp with fixer water. With your fabric laid flat, randomly pinch and severely wrinkle fabric. Apply dyes to fabric until all visible white spaces are colored. Flip shirt over and apply dye. For extra bursts of color, sprinkle small amounts of powdered dye over fabric.